Disable wp-cron.php in WordPress
What is a cron job
A cron job is a scheduled task. It refers to a task (a command or script) scheduled to run automatically on your server at a specified date and time. They are a very useful way to automate repetitive tasks such as deleting temporary files or modifying databases.
The wp-cron.php file
The wp-cron.php file is the file used by WordPress to automate actions such as publishing scheduled posts, sending email notifications or checking for plugin updates. It is used as a virtual cron job.
By default, when a scheduled task is present, WordPress is setup to call wp-cron.php every time there is a new visit to your WordPress website. Essentially, when someone visits your site, WordPress checks with wp-cron.php to see if it is time to do anything.
However, calling wp-cron.php every time someone visits your site, although perfectly fine on low traffic websites, can lead to resource usage problems on your server as your site visits start to increase. This will make your website loading time increase, making your site slower.
Disabling the default wp-cron.php behaviour
By editing the wp-config.php file, you can tell WordPress to stop the default execution of wp-cron.php and to let you handle that instead.
In order to disable the default wp-cron.php behaviour, follow these steps:
1. Log into cPanel.
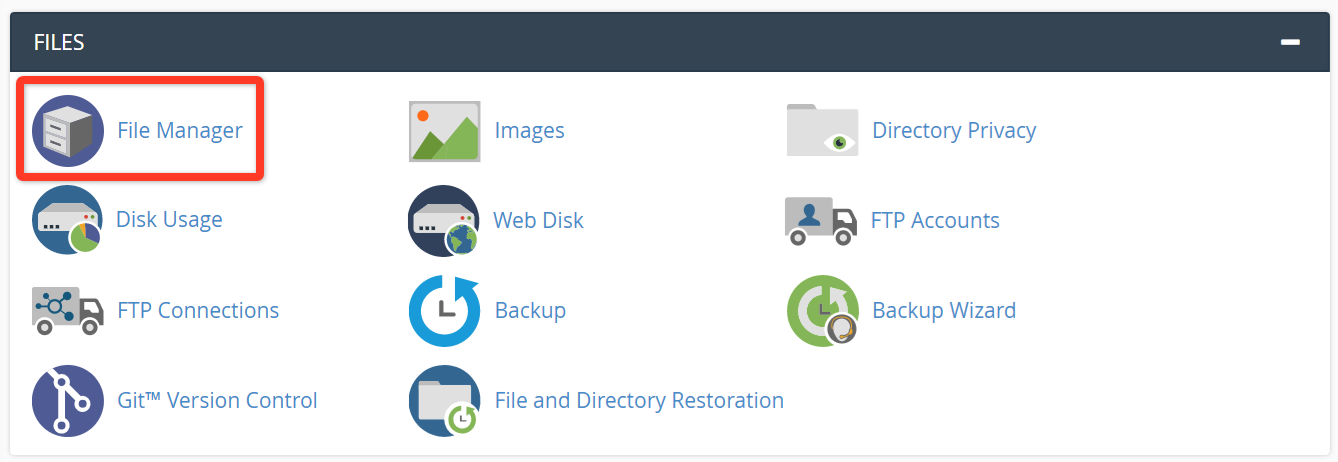
2. Open the File Manager.
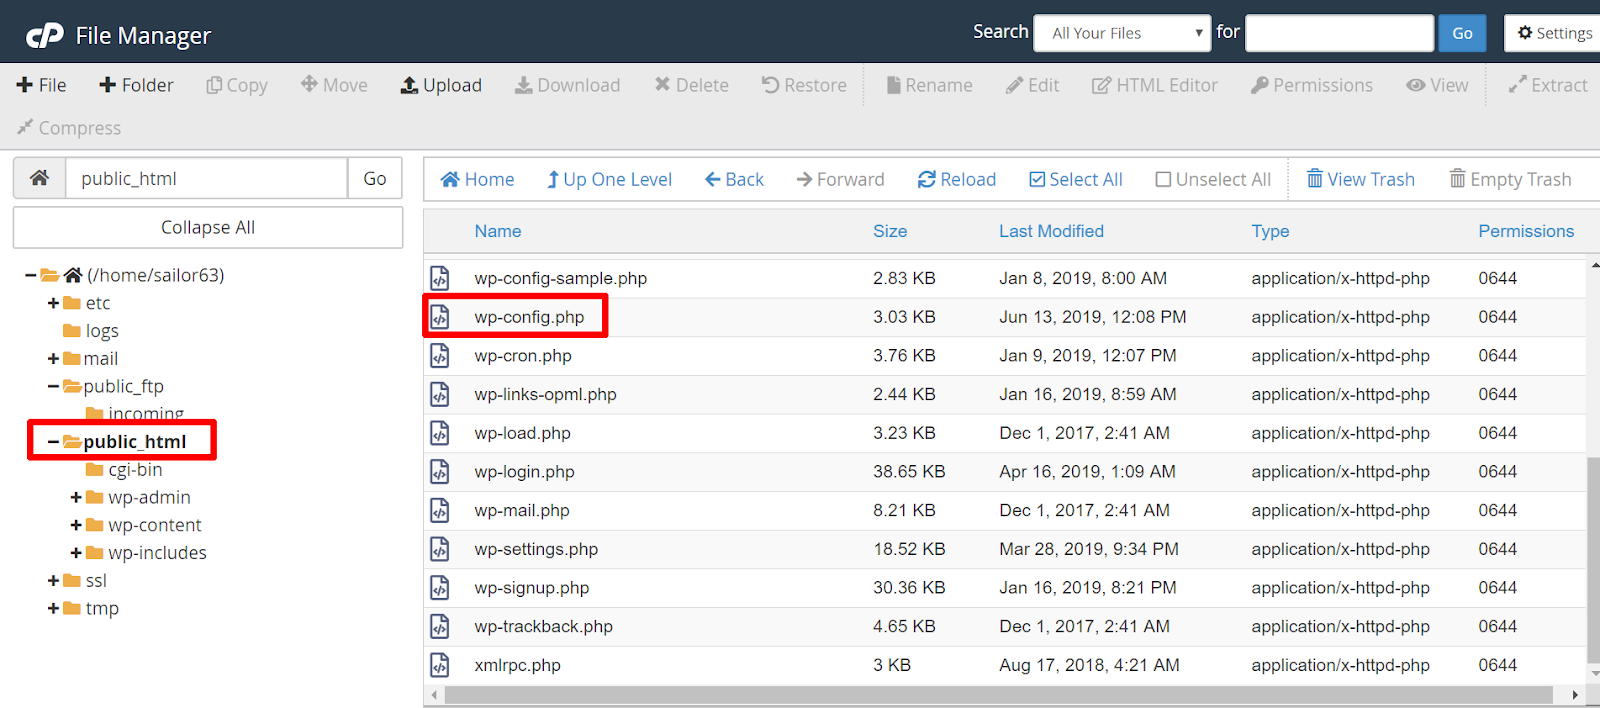
3. In the directories tree on the left side of the page, click the public_html folder to open that directory. You’ll see the wp-config.php file inside it.
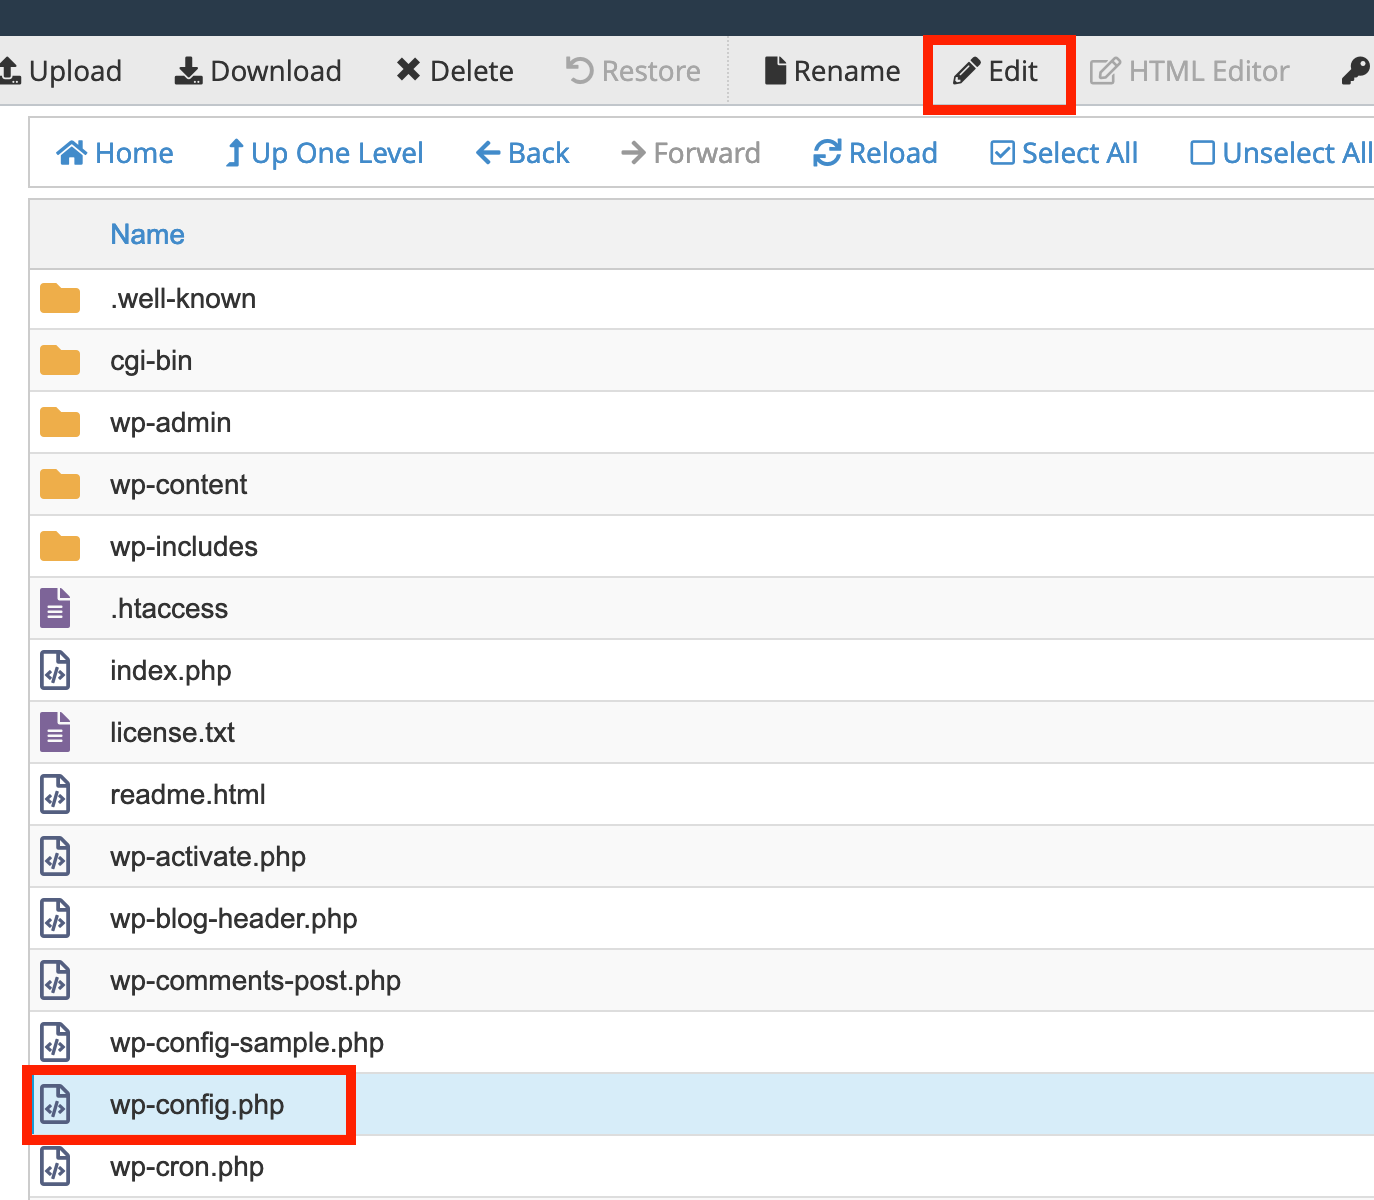
4. Click the wp-config.php file once and then click the Edit button in the toolbar.
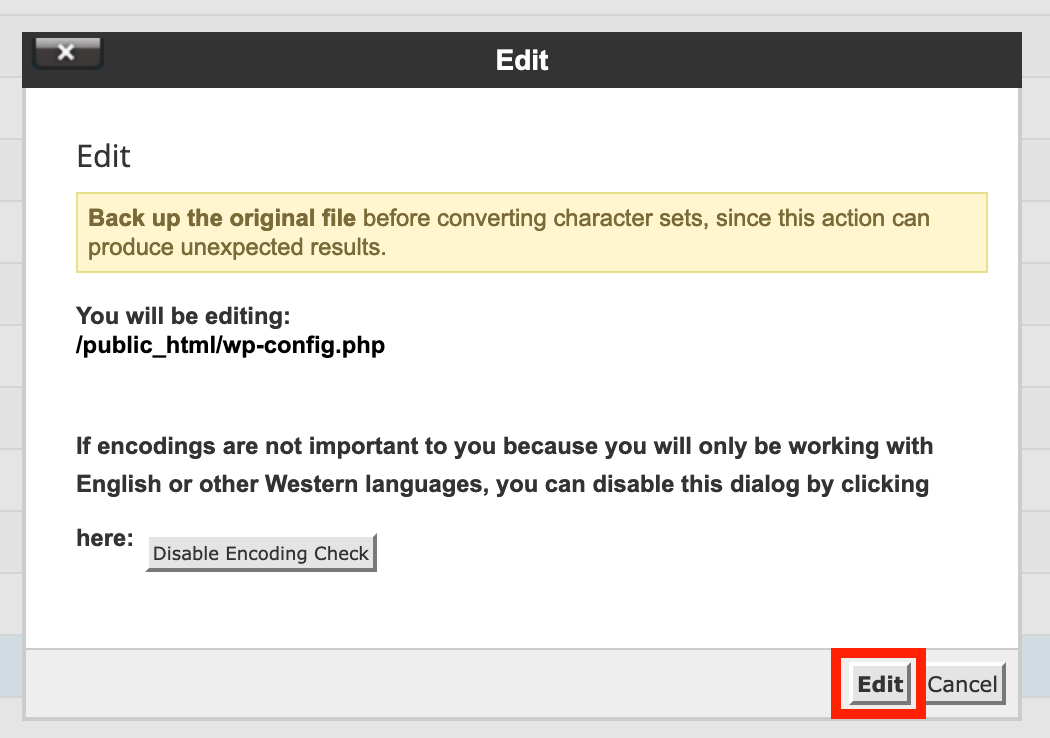
5. Click the "Edit" button in the window that appears
6. Add the following code at the bottom of the database section:
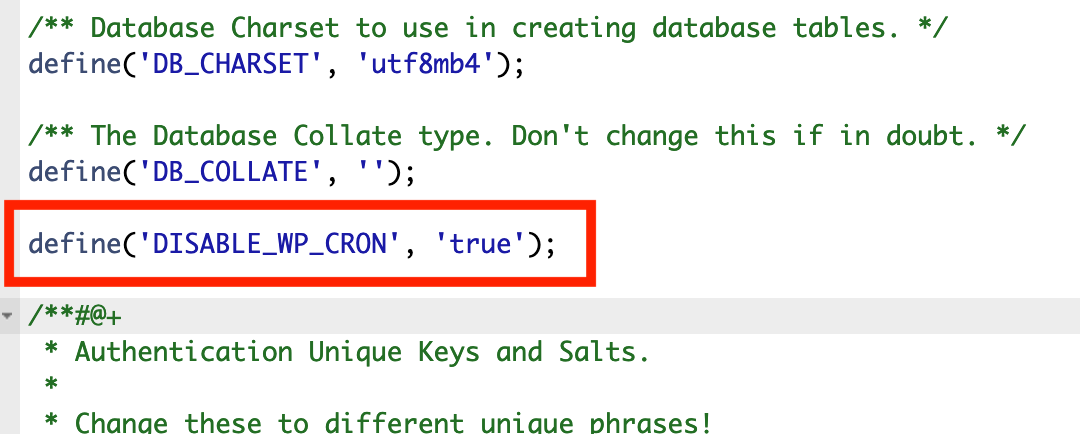
7. Save the file by clicking Save Changes in the top right corner.

You’re all set! Now WordPress will stop calling wp-cron.php automatically every time a new visitor comes to your website.
Note, however, that this will completely disable all cron jobs. To keep scheduled tasks running, you’ll need to manually set up cron jobs.
Setting up manual cron jobs for wp-cron.php
High traffic websites can get hundreds or even thousands of visitors a day, which means you would potentially have hundreds of thousands of executions of the wp-cron.php script. For most WordPress websites, running the script every 12 hours (twice a day) is fine.
To set that up, follow these steps:
1. Log into cPanel.
2. Under the Advanced section, click on Cron Jobs.

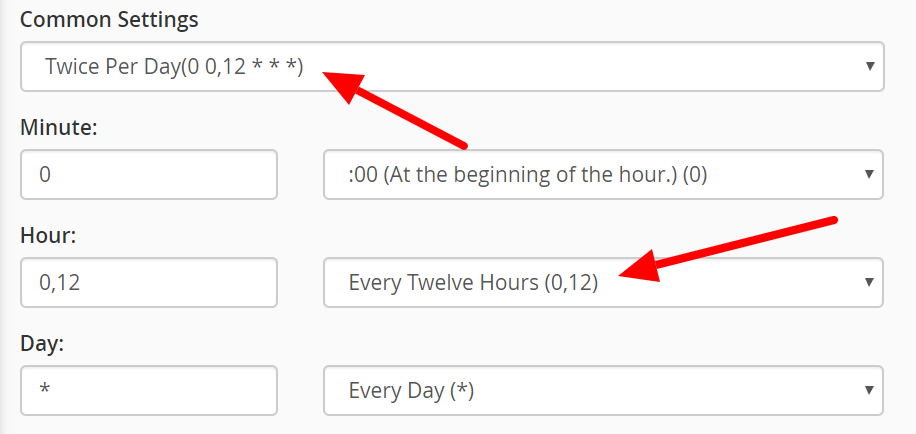
3. In the Add New Cron Job section, click the Common Settings drop-down and select Once Per Hour (0 * * * *).

4. Scroll down to the Hour drop-down and select Every 12 Hours (0,12). You’ll notice Common Settings will now say Twice Per Day (0 0,12 * * *).
5. Scroll down to the Command text box and fill in the following code to run the cron job: “cd /home/username/public_html; php -q wp-cron.php” where username is your cPanel username.
6. Click Add New Cron Job.
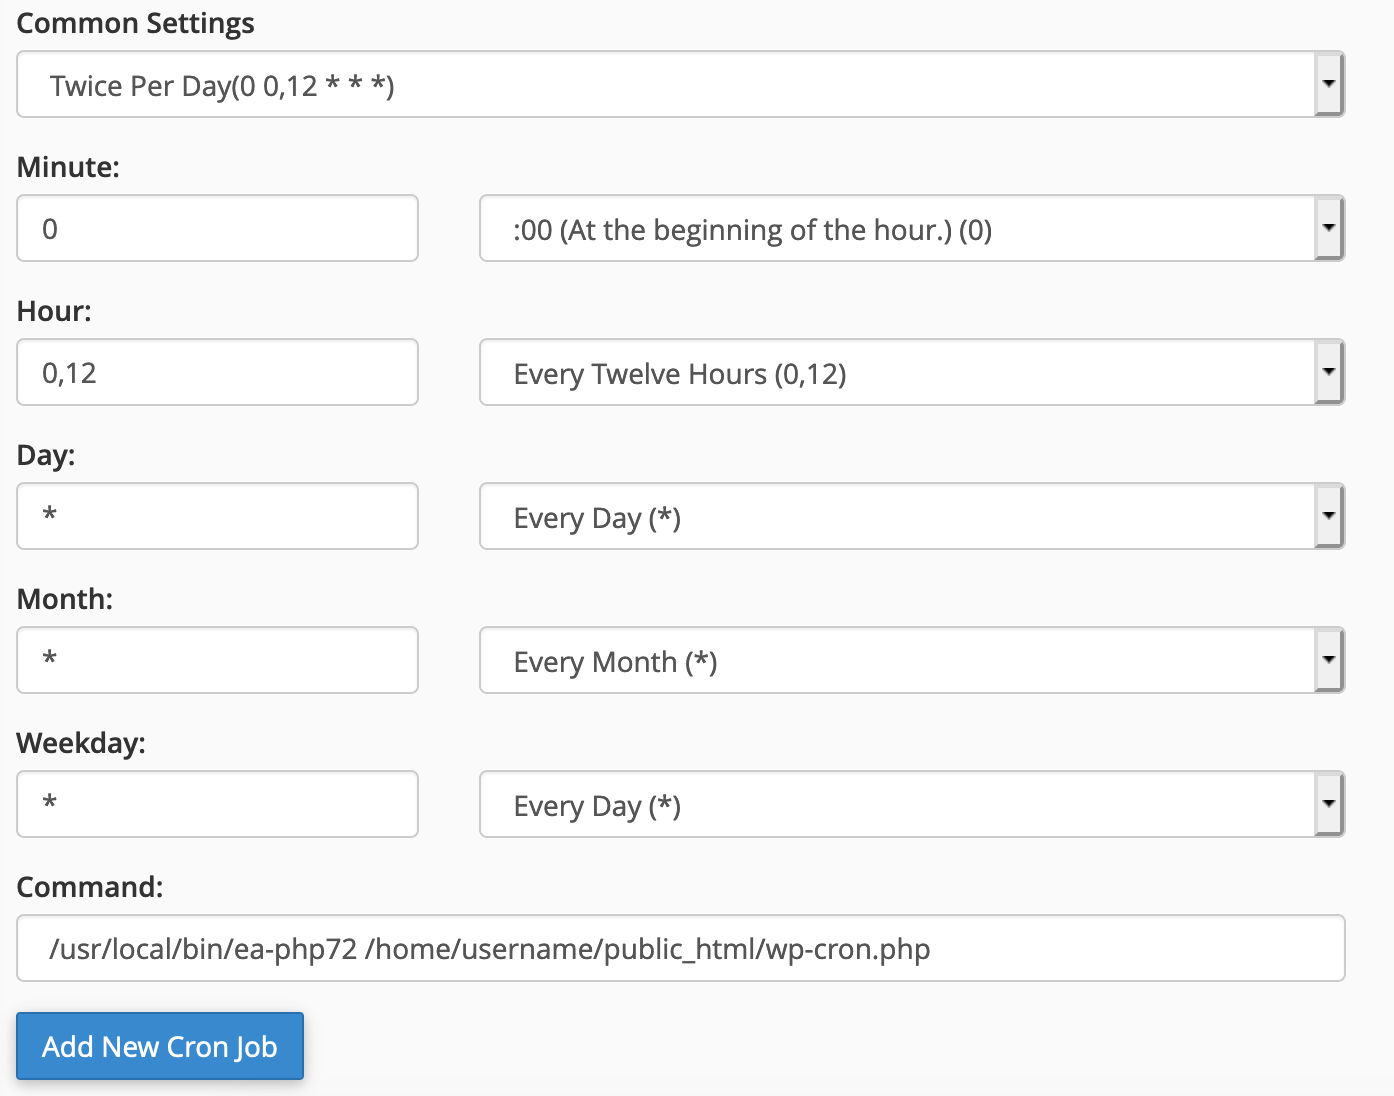
NOTE: the /home/username/public_html path is for your primary domain. If you have WordPress installed in a subdirectory or if you’re using an addon domain you’ll need to update the path and make sure it refers to the directory that hosts your wp-cron.php file.
Once you’ve completed the steps above, you will see your new cron job successfully added to the Current Cron Jobs section.
Now WordPress should no longer be calling wp-cron.php every time someone visits your site, but instead running scheduled tasks at set intervals that won’t cause resource usage problems.
A cron job is a scheduled task. It refers to a task (a command or script) scheduled to run automatically on your server at a specified date and time. They are a very useful way to automate repetitive tasks such as deleting temporary files or modifying databases.
The wp-cron.php file
The wp-cron.php file is the file used by WordPress to automate actions such as publishing scheduled posts, sending email notifications or checking for plugin updates. It is used as a virtual cron job.
By default, when a scheduled task is present, WordPress is setup to call wp-cron.php every time there is a new visit to your WordPress website. Essentially, when someone visits your site, WordPress checks with wp-cron.php to see if it is time to do anything.
However, calling wp-cron.php every time someone visits your site, although perfectly fine on low traffic websites, can lead to resource usage problems on your server as your site visits start to increase. This will make your website loading time increase, making your site slower.
Disabling the default wp-cron.php behaviour
By editing the wp-config.php file, you can tell WordPress to stop the default execution of wp-cron.php and to let you handle that instead.
In order to disable the default wp-cron.php behaviour, follow these steps:
1. Log into cPanel.
2. Open the File Manager.

3. In the directories tree on the left side of the page, click the public_html folder to open that directory. You’ll see the wp-config.php file inside it.

4. Click the wp-config.php file once and then click the Edit button in the toolbar.

5. Click the "Edit" button in the window that appears

6. Add the following code at the bottom of the database section:
define('DISABLE_WP_CRON', 'true');

7. Save the file by clicking Save Changes in the top right corner.

You’re all set! Now WordPress will stop calling wp-cron.php automatically every time a new visitor comes to your website.
Note, however, that this will completely disable all cron jobs. To keep scheduled tasks running, you’ll need to manually set up cron jobs.
Setting up manual cron jobs for wp-cron.php
High traffic websites can get hundreds or even thousands of visitors a day, which means you would potentially have hundreds of thousands of executions of the wp-cron.php script. For most WordPress websites, running the script every 12 hours (twice a day) is fine.
To set that up, follow these steps:
1. Log into cPanel.
2. Under the Advanced section, click on Cron Jobs.

3. In the Add New Cron Job section, click the Common Settings drop-down and select Once Per Hour (0 * * * *).

4. Scroll down to the Hour drop-down and select Every 12 Hours (0,12). You’ll notice Common Settings will now say Twice Per Day (0 0,12 * * *).

5. Scroll down to the Command text box and fill in the following code to run the cron job: “cd /home/username/public_html; php -q wp-cron.php” where username is your cPanel username.
6. Click Add New Cron Job.

NOTE: the /home/username/public_html path is for your primary domain. If you have WordPress installed in a subdirectory or if you’re using an addon domain you’ll need to update the path and make sure it refers to the directory that hosts your wp-cron.php file.
Once you’ve completed the steps above, you will see your new cron job successfully added to the Current Cron Jobs section.
Now WordPress should no longer be calling wp-cron.php every time someone visits your site, but instead running scheduled tasks at set intervals that won’t cause resource usage problems.
